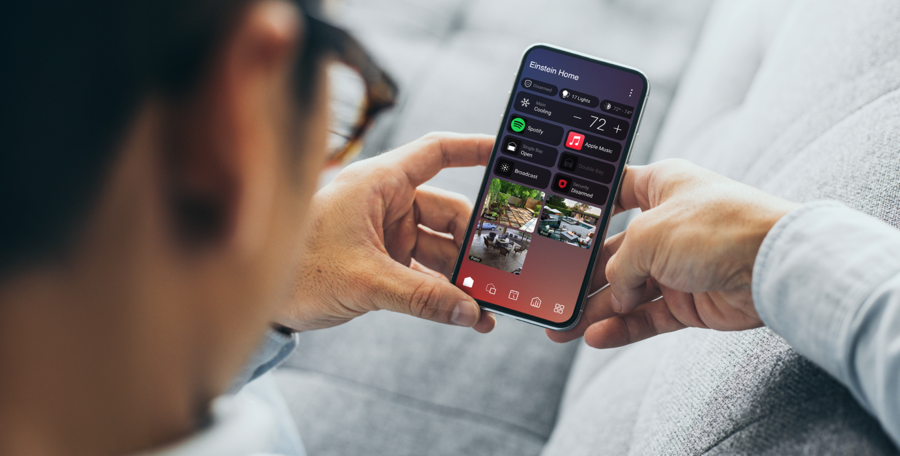
Learn everything you need to know about these innovative display solutions
Video walls are becoming one of the most transformative visual technologies in luxury homes and high-design residential spaces. Unlike traditional televisions or projectors, an LED video wall is not a single display. It is a system, engineered, modular, serviceable, and built to scale. And as more homeowners seek large-format cinematic experiences beyond 100 inches, LED video walls have emerged as a compelling option for media rooms, home theaters, multipurpose living spaces, and architectural feature walls.
At Interactive Spaces, we regularly see growing interest from homeowners, architects, designers, and builders who are hearing about “LED walls” but are unsure what makes them different from TVs or projectors, or whether they are even worth considering. In our guide, we’ll demystify LED video walls and dive into what they really are, how they work, and what to consider before specifying one.
Whether you are exploring an LED video wall for your own home or need to understand how to plan for one in a project, let’s explore these solutions so you can make an informed decision.
What a Video Wall Really Is
At a basic level, a residential LED video wall is a display surface made up of many smaller LED modules that tile together to form one large, seamless screen. The technology behind them is called direct-view LED. Unlike traditional TVs, which use one large LCD or OLED panel, an LED video wall is constructed from multiple parts that work together as a single system.
At the heart of the wall are LED cabinets. These are rigid, factory-assembled sections that contain smaller LED modules, a structural frame, integrated power supplies, receiving cards, and internal electronics. Each cabinet locks into the next with precise alignment to create a flat, uniform display surface. Mounted onto each cabinet are LED modules, the smaller tiles that contain the actual LEDs arranged in a pixel grid. If a fault occurs, a module or a cabinet can be removed and replaced without dismantling the entire display, which is one of the reasons LED walls are more serviceable and sustainable over time than massive televisions.
Unlike projection systems, LED walls emit light directly. That means brightness and contrast stay consistent in both bright and dark environments, making them suitable for multi-purpose family rooms as well as dedicated theaters. Combined with modular sizing, where the wall can be built in almost any dimension or aspect ratio, LED walls offer design freedom that traditional displays can’t match.
LED walls are also becoming increasingly popular because they free you from television sizes. You are no longer constrained to 83”, 97”, or 100”. You can design a screen to perfectly fit a wall, recess it, wrap it, or incorporate it into millwork without the visual compromise of black borders or unused wall space.
Another significant difference is that LED walls are systems, not consumer appliances. A TV is plug-and-play: one power cable, one HDMI cable. An LED wall involves structure, power engineering, control hardware, data distribution, video processing, alignment, and calibration. This makes planning and professional installation essential, but also unlocks performance well beyond what a consumer TV can deliver.
Why LED Video Walls Are Rising in Luxury Homes
Just a few years ago, LED video walls were nearly exclusive to commercial environments, such as broadcast studios, performance venues, corporate lobbies, and digital signage. Today, LED video walls are one of the fastest-growing display categories in high-end residential AV design. These are a few of the several factors fueling this shift:
The Desire for Larger Screens
Homeowners increasingly want screens larger than 100 inches. While TVs have grown significantly, the consumer market hits a practical ceiling at around 97”–110” before cost, weight, delivery constraints, and limited model choices become major obstacles. An LED video wall has no such limitation. It can be built at 120”, 150”, 180”, or even wall-sized without being considered “custom manufacturing.” The product is inherently scalable.
Performance in Ambient Light
Traditional projection systems deliver their best performance in fully light-controlled environments. Many luxury homes today feature open floor plans, expansive windows, and bright multi-purpose spaces where families want to watch sports, concerts, or casual content without dimming the lights. Because LED walls emit light directly and can reach high brightness levels, image quality remains vivid even in well-lit rooms.
Design Freedom
An LED wall is not restricted to standard TV aspect ratios. A media room might call for 16:9, but an architectural feature wall could be ultra-wide, stretched, wrapped, curved, column-mounted, or installed as a digital art canvas. This has caught the attention of interior designers and architects who value aesthetics as much as performance.
Designers appreciate that LED walls eliminate the “black mirror” effect, where a large TV appears as a dark rectangle on the wall when turned off. LED walls can switch into ambient modes, digital art, kinetic visuals, or low-brightness decorative content, making them an integrated design feature rather than a visual compromise.
Rising Home Theater Ambitions
Post-2020, many homeowners began investing more into residential entertainment spaces. Basements, bonus rooms, garages, and unused spaces are frequently being converted into dedicated theaters or hybrid gaming and sports-viewing rooms. LED walls have become a premium alternative when a homeowner wants an experiential room rather than a conventional theater. The immersive feel, brightness, and size have made LED walls attractive for sports, concerts, Formula 1, gaming, and multi-window viewing experiences.
Improved Cost Versus Value
While LED walls remain a premium investment, the cost curve has shifted. Advancements in manufacturing, increased competition, and broader adoption have made LED walls more accessible relative to high-end projection systems with masking screens, lens upgrades, high-gain screens, and advanced room treatments. When homeowners compare a complete reference projector system vs. a comparably sized LED wall, the gap is narrowing, especially when factoring longevity, brightness consistency, and maintenance.
The 4K Video Wall Myth
One of the most persistent misconceptions with residential LED video walls is the belief that the wall “needs to be 4K.” This thinking comes directly from the television world, where shoppers compare 1080p vs. 4K vs. 8K because screen sizes are fixed and pixel density is the differentiator. With LED walls, this logic breaks down, because resolution is not the primary metric for LED walls. Pixel pitch and viewing distance are.
A 4K television has 3840 × 2160 pixels on a single fixed-size panel. But an LED wall can be built at nearly any size. To achieve 4K on a very large wall, you would need an extremely fine pixel pitch, which dramatically increases cost and often provides no visible benefit at a normal viewing distance.
For example, a 150” or 180” LED wall viewed from 10–14 feet away can look incredibly sharp at 1.2mm or 1.5mm pitch, even if it’s not technically “4K” in pixel count. The human eye’s resolving capability at that distance is the more relevant factor.
Why 4K Is Sometimes a Waste of Money on LED Walls
Achieving true 4K resolution on a large LED canvas requires an extremely tight pixel pitch (often below 1.0mm). That level of density dramatically increases LED count, driver complexity, power consumption, thermal output, calibration intensity, production sorting, and cost. But if the seating distance is 10 feet or more, the human eye likely cannot distinguish the extra detail.
It’s similar to printing a magazine cover. You don’t print it on a billboard at the same DPI, because the viewing distance changes the resolution that matters.
When 4K Does Make Sense for LED Walls
There are a few scenarios where having a 4K LED Wall display makes sense, such as:
- If the seating distance is very close (e.g., 4–6 feet)
- If you intend to use the wall for detailed visual content, such as gaming, high-resolution photography, or close-up art display
- If the wall is physically smaller (e.g., 110”–130”) where pixel density becomes more visible
LED Packaging Matters More Than Most People Realize
When evaluating LED video walls, one of the most important decisions is selecting the LED packaging technology or, in other words, how each pixel (or group of subpixels) is physically built and protected. This affects:
- Image quality
- Durability
- Viewing angles
- Surface uniformity
- Serviceability
- Cost
In residential installations, understanding SMD vs COB vs GOB helps determine which technology best suits the room, the use case, and the likelihood of accidental contact.
SMD (Surface-Mount Device)
SMD is the most widely used LED type historically and remains extremely common in both commercial and residential walls. Each pixel is created by mounting three tiny LEDs (red, green, blue) as a single package onto a PCB. These packages are exposed on the surface of the module.
These are a few technical characteristics to keep in mind:
- Pixel structure: Distinct RGB sub-pixel clusters
- Surface: Exposed LEDs—no protective coating
- Brightness: Excellent
- Color mixing: Very good, but may show minor color fringing at extremely close distances
- Heat dissipation: LEDs are air-exposed, aiding cooling
The main advantages for SMD is that they are available in the widest range of pixel pitches, you can get them at competitive prices, and they are proven, reliable and easier to service at a component level.
The cons, on the other hand, are that these LEDs are more prone to physical damage; oils, fingerprints, dust, or accidental contact can degrade pixels, and cleaning requires extreme care. For these reasons, SMD are better for rooms where the LED wall won’t be touched, such as dedicated theaters or adult-focused media rooms.
COB (Chip on Board)
COB represents a more advanced LED packaging technology aimed at improving durability and visual performance. Instead of packaging RGB LEDs individually, bare LED dies are mounted directly to the PCB substrate, then sealed with a thin protective layer (often a matte black resin). This creates a smooth, solid-state surface rather than exposed diodes.
These are the technical characteristics you should keep in mind:
- Pixel structure: Continuous surface; no exposed diodes
- Surface: Smooth, durable, impact-resistant
- Black levels: Improved due to darker, non-reflective surface and reduced micro-reflections
- Thermal: Better conduction through substrate; improved reliability over time
The main pros of COB are that, since they have a much higher durability, these are safer for homes with kids, pets, and cleaning crews. Plus, they provide improved uniformity and black levels, enable finer pixel pitches for close seating distances, and are easier to clean with less risk of damage.
The cons are that they are typically more expensive than SMD, their repairs often require full module swap rather than single LED work, and early-generation COB had issues with color shift at angles, though they are now significantly improved. This makes them best for luxury residential, especially where people may approach or touch the screen, or where 1.2mm or finer pitch is desired.
GOB (Glue-On-Board)
GOB is often confused with COB, but it is not the same technology. It is SMD with a protective coating, not a different LED mounting method. Pixels are still standard SMD LEDs mounted on the PCB, but the entire module surface is coated with a transparent or semi-transparent epoxy resin “glue” layer. This seals and protects the LEDs from direct contact.
These are the technical characteristics you should keep in mind:
- Pixel structure: SMD underneath a protective layer
- Surface: Glossy or semi-matte protective resin finish
- Durability: Significant improvement vs bare SMD
- Optical behavior: Coating alters light diffusion and reflectance
The main advantages is that they dramatically increase resistance to impact, moisture, dust, and static discharge; they retain the broad SMD ecosystem, manufacturing scale, and cost efficiency; and are the ideal compromise for residential environments where touch or accidental contact is likely
The main cons people find for GOB is that resin can introduce surface glare or reflections if not high quality, the lower-cost formulas risk yellowing over time with heat or UV exposure, and repairs can be more complex, as the coating must be reapplied uniformly. Plus, optical diffusion can slightly soften pixel edges at very close distances
The GOB is best used in family rooms, multipurpose living areas, or any installation where protection is needed but COB pricing isn’t justified.
Which LED Type Is Best for Luxury Homes?
There’s no universal winner, but there is a right fit for the environment and use case. Based on performance and practicality in real homes, these are the LED types that might go better in your home:
- Dedicated theaters (controlled environments): SMD or COB
- High-traffic family rooms / kids / pets: COB or GOB
- Design-driven spaces with close viewing & dark surfaces: COB
- Budget-sensitive but still needing durability: GOB over bare SMD
Pixel Pitch & Viewing Distance: How Do I Choose Correctly?
Pixel pitch is the single most important specification when selecting a residential LED video wall. Choosing the wrong pixel pitch is the fastest way to overspend, or to end up with a wall that doesn’t look as sharp as expected from typical seating distances.
Pixel pitch defines the distance in millimeters between the centers of adjacent pixels (e.g., 1.2mm, 1.5mm, 1.9mm). The smaller the number, the more tightly packed the pixels are, creating higher perceived resolution at closer distances. Unlike TVs where resolution is fixed (e.g., every 77” OLED at 4K has identical pixel density), pixel density on LED walls is variable and must be matched to the installation. Pixel pitch determines:
- Minimum comfortable viewing distance
- Visual sharpness and “screen door effect” visibility
- Cost of the wall (LED count drives cost more than size)
- Processing and bandwidth requirements
A finer pitch looks sharper up close, but becomes increasingly expensive and often visually irrelevant once seating distance increases.
A widely used starting point is that for every 1.0mm of pixel pitch, the ideal viewing distance is ~1 meter (3.3 feet). For instance, for a 1.2mm pitch, then 1.2m (3.9 ft) is the minimum ideal distance
Understanding “Perceived Resolution”
LED walls don’t need to hit 4K pixel count to look 4K-sharp because bigger screens increase angular resolution to the eye and, at typical seating distances, your eye can’t resolve pixel-level detail beyond a certain density
This is why a 1.5mm wall at 140–165 inches can look “4K-sharp” from 10–14 feet away, even if its native pixel count is below 3840×2160.
Technical Comparison to Projectors and OLEDs
Projectors have been the reference standard for home theaters for decades, largely because they replicate the cinematic experience: a large image, front-of-room projection, and a darkened environment that mimics commercial theaters. LED video walls disrupt that model by delivering large-format images in a fundamentally different way.
In a dvLED Video Wall, each pixel emits light directly, producing self-illuminated images. There is no projection surface, no optical lensing, and no dependency on room reflectivity. Brightness and contrast are intrinsic to the hardware.
Projectors, on the other hand, throw light toward a reflective (or diffusive) screen surface. The image quality is heavily influenced by screen type and gain, surface color and reflectivity of the room, throw distance and optical lens quality, and the ambient light.
In simple terms, projectors deliver a cinema-style experience in dark rooms, while LED walls deliver a cinema-plus-sports-plus-daytime-viewing experience in any lighting condition.
Things change slightly, however, when you compare dvLED video walls to OLED, which has been the gold standard for image quality in consumer displays for over a decade. It delivers exceptional blacks, near-infinite contrast, and highly accurate color reproduction. At sizes up to ~100 inches, OLED is often the reference choice. But once size, brightness, architecture, and room use evolve, dvLED enters a different performance class. Some luxury homeowners choose both, using a projector + LED wall (or OLED + LED wall combination) to create different modes. For instance, during the day, dvLED is used to sports, casual TV, gaming, and bright-room viewing. In the evening, projector or OLED are used for reference-grade cinema in total darkness. Hybrid rooms are becoming more common in high-end builds, especially where the theater is also used as a social space.
What Actually Impacts LED Wall Performance
When researching LED video walls, most homeowners, and even many designers, tend to focus on a few headline specs: pixel pitch, brightness, “4K,” or LED type. But those metrics alone don’t determine how good a wall will actually look once installed. Unlike TVs, where you compare model A vs. model B, LED walls are systems composed of multiple variables that must work together.
The following factors have a significant impact on real-world image quality and should be understood before specifying or selecting a system.
PWM Frequency (Pulse-Width Modulation)
Pulse-width modulation controls how LEDs dim. The higher PWM, the smoother and cleaner the image. They flicker rapidly at varying duty cycles to achieve different brightness levels. Although this flicker is too fast to see directly, the PWM frequency affects:
- Motion clarity
- Flicker perception
- Camera safety (important for content creators or video calls)
- Eye comfort for long viewing sessions
Low PWM can cause visible flicker during slow pans, near-black content, or when filmed with cameras. For residential use, especially in multi-purpose family rooms, 3,840 Hz or above is the minimum recommended.
Scan Ratio (Multiplexing)
LED modules rarely drive every pixel continuously. To reduce heat and power, pixels are illuminated in “scan groups.” A 1/8 scan means only 1/8 of the pixels are lit at any instant, cycling rapidly. Higher scan ratios, such as 1/16 or 1/32, can result in:
- Reduced brightness
- More visible flicker in motion
- Poorer uniformity in low-brightness scenes
Lower scan ratio means more LEDs lit per cycle, which leads to higher visual stability and brightness.
Color Bit Depth and Processing
LED walls rely on external processors to interpret and map incoming video signals. Bit depth affects gradation smoothness, banding avoidance, and HDR quality. The 8-bit, for instance, is basic and prone to banding in gradients, while the 10-bit is the recommended minimum for home theater applications. The 12-bit, on the other hands, is considered premium; excellent for HDR, avoids posterization in shadows
Uniformity Across Cabinets
Because an LED wall is built from multiple cabinets, uniformity becomes a critical part of the design and calibration process. Every cabinet must match in brightness to maintain consistent luminance across the entire display, and color uniformity must be carefully managed since LED batches naturally vary; proper calibration helps blend everything together seamlessly. Even replacement modules need to be batch-matched to avoid introducing visual inconsistencies later. Without this attention to uniformity, even small differences can cause noticeable patchiness or visible seams, especially during darker scenes or smooth gradients.
Frame Synchronization and Scan Latency Between Cabinets
If cabinets are not perfectly synchronized, “tearing” or micro-lag across the wall can occur. Premium processors handle cabinet sync to ensure the entire surface refreshes as one coherent image. This is especially relevant for gaming, live sports, and fast camera pans.
Brightness vs Contrast Balance
Many LED walls advertise high brightness numbers, but residential performance is about balance, not brute force. Running an LED wall too bright in a dark room reduces perceived black quality, causes eye fatigue, and produces harsh HDR. For dedicated theaters, 200–350 nits calibrated peak brightness is ideal, but for mixed-use living spaces, 300–600 nits is appropriate.
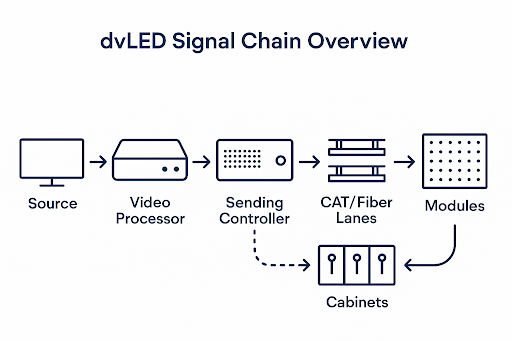
Video Processing & Control Chain
One of the biggest differences between an LED video wall and a TV is the signal chain. A TV has an integrated processor, scaler, and display engine inside the chassis. An LED wall distributes these functions across multiple devices, each performing a distinct role. Image quality, latency, HDR handling, and uniformity depend heavily on how this chain is designed.
Before specifying or buying an LED wall, it’s important to understand where video enters, how it is processed, how it is transmitted to the screen, and how the screen assembles the final image.
Here is the simplest way to describe the chain:
Source → Video Processor → LED Controller (Sending Unit) → Data Transport (CAT/Fiber) → Receiving Cards → LED Modules
What goes into the rack and what goes into the wall are not the same thing.
- The video processor prepares the image.
- The LED controller/sender breaks the image into data zones and transmits it to the wall.
- Each cabinet has receiving cards to decode its assigned portion of the image.
- The wall displays the assembled content as one seamless image.
Cabinet Mapping, Data Flow & Redundancy
Every LED wall must be “mapped” so the controller knows which pixels belong to which cabinet. Quality of mapping affects how cleanly the image renders and how well the system responds to faults.
When designing an LED wall, careful mapping is just as important as calibration. Data regions must be distributed evenly across cabinets to prevent bandwidth bottlenecks, and the choice between horizontal or vertical mapping affects latency paths and failure domains. Poor mapping can lead to tearing, misalignments, or delayed region refresh, all of which undermine visual performance. Expert installers rely on platforms like NovaLCT from NovaStar or Helios from Megapixel to program this mapping, ensuring the LED wall operates reliably and displays content smoothly.
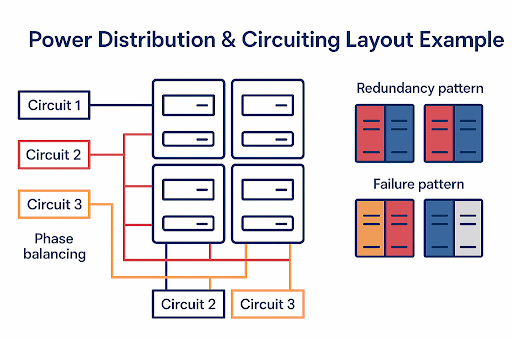
For residential LED wall installations, redundancy is strongly recommended to ensure the level of reliability clients expect. This protection is typically built into two layers: power redundancy, where cabinets use dual power supplies so the display stays lit even if one fails, and data redundancy, which provides duplicate data paths that automatically take over if a CAT or fiber link goes down. With these measures in place, a well-engineered wall continues operating smoothly even if a power supply or data run fails, ensuring the client never experiences a black screen.
Power & Electrical Engineering for LED Walls
One of the most overlooked aspects of specifying a residential LED video wall is power planning. Unlike a television, which draws power from a single outlet, an LED wall requires multiple power circuits, distributed across cabinets, with load balancing and thermal considerations. Proper electrical design ensures stable performance, prevents voltage sag, and extends component lifespan.
LED walls consume power in a dynamic way. Power draw varies based on screen size, pixel pitch, brightness level, content type (bright vs dark scenes). LED packaging (COB vs SMD), refresh scan configuration At maximum brightness, though this is never recommended for residential spaces, power usage spikes. For typical calibrated residential use, consumption is significantly lower.
Mechanical Design, Mounting & Structural Planning
Installing an LED video wall is not like hanging a TV. It is more similar to installing a piece of precision equipment integrated into the architecture of the room. Mechanical planning affects alignment, longevity, service access, heat management, and overall aesthetics. Integrators, designers, and contractors must coordinate early to ensure proper structure and support.
LED walls require a perfectly flat mounting surface. Even slight deviations can cause visible seams, shadow lines, or cabinet misalignment. Surface variation must be ≤ 1.5mm across the entire wall. Many pros aim for ≤ 1mm for premium residential. LED modules tile together. If one cabinet protrudes or recesses even slightly, it becomes visible as a line or shadow during specific content, especially panning shots or bright solid colors.
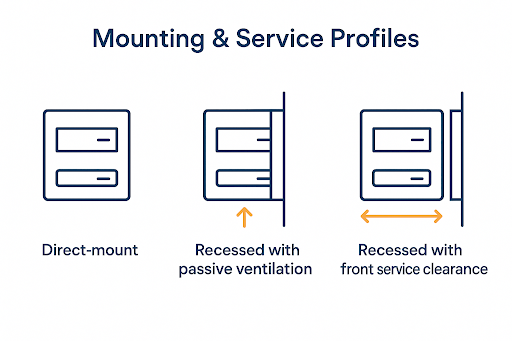
Mounting Systems
There are three common mounting approaches for LED walls, each suited to different room and structural conditions. Direct wall mounting uses a steel or aluminum frame attached straight to the wall, offering the lowest profile but requiring very precise wall preparation. Freestanding or movable frames are ideal when the wall can’t support the load, adding some depth but providing flexibility in placement and service access. For a premium, built-in look, recessed architectural integration involves building the wall surface forward so the LED display sits flush with surrounding finishes, though this method requires careful planning for ventilation and serviceability.
Ventilation & Heat Management
LED walls produce heat from their power supplies, driver ICs, and LEDs, and without proper thermal design, that heat can shorten component lifespan and cause visible color drift. Adequate airflow is essential, with at least 2–4 inches of clearance above and below the wall, and recessed installations should include vent channels or silent fans to maintain circulation. It’s important not to seal an LED wall inside a closed cavity, as even COB modules require passive air exchange to operate reliably and maintain consistent image quality.
Ambient Light & Surround Surface Considerations
Reflective materials around an LED wall can significantly impact perceived contrast, particularly during darker scenes. To maintain image quality, it’s best to use matte or satin finishes on nearby surfaces, and if the display is framed in millwork, gloss finishes should be avoided. In dedicated viewing rooms, surrounding the LED perimeter with dark, non-reflective materials helps the image appear to “float,” enhancing the overall visual experience.
Serviceability Requirements
Because LED walls are modular systems, they must be designed with serviceability in mind. Panels should be removable without damaging surrounding millwork, and hidden cable slack or service loops should be incorporated to allow technicians to access internal components. It’s also important to provide concealed access points for power supply replacements. Many high-end residential LED installations encounter problems not due to poor hardware, but because proper service access wasn’t planned from the start.
Installer Pitfalls to Avoid
Even with high-quality LED technology, certain installation mistakes can compromise performance and long-term reliability. Some of the most common pitfalls to avoid include:
- Mounting on drywall without backer support
- Not planning cable pathways behind the mounting frame
- Forgetting to coordinate with electrician before wall closing
- No ventilation in recess
- Millwork installed too tight to remove modules
Audio with LED Walls & How to Maintain a Realistic Center Image
Audio design becomes more challenging when using a LED video wall because the screen is not acoustically transparent. In a traditional projector-based theater, speakers are placed behind a perforated or woven screen, allowing the sound, especially dialogue, to originate from the center of the image. With LED walls, that “ideal” center-channel placement is blocked by the display surface.
In residential rooms, three physical LCR configurations work. Which one to choose depends on screen height, seating, room layout, and cabinetry.
Option 1: LCR Above the Screen
In a “CR Above the Screen” configuration, all three front channels are mounted directly above the LED wall and angled downward toward the listening area. This approach keeps the left, center, and right speakers tightly clustered, preserving soundstage coherence while simplifying cabinetry and integration with the display. It works especially well when the screen isn’t mounted too high, though it does require precise angling to prevent the audio from seeming like it’s coming from the ceiling. If the speakers sit too far above ear level, immersion can also be reduced.
This layout is best used when the LED wall is positioned low enough that above-screen placement remains reasonable. For optimal results, the speakers should be aimed directly at ear height with adjustable mounts, and models with controlled vertical dispersion can help limit unwanted ceiling reflections.
Option 2: LCR Above + Below the Screen (Split-Array Realignment)
In an LCR Above + Below the Screen, or “Split-Array Realignment,” setup, the left and right speakers are positioned above the LED wall while the center channel sits just below it or, in some cases, two center speakers are used (one above and one below) to pull the sonic image toward the middle of the screen. This configuration offers stronger dialogue anchoring and minimizes vertical localization issues, and it performs exceptionally well when paired with Trinnov’s remapping capabilities. The tradeoff is that it requires more installation effort, and any below-screen speaker must be positioned carefully to avoid floor or furniture reflections.
This layout is particularly effective in rooms with multiple seating rows or when the screen height is substantial. For best performance, identical speakers should be used if doubling the center channel, the upper and lower speakers must be time-aligned (with Trinnov providing helpful tools), and a single below-screen center should be angled upward toward the main listening position.
Option 3: L/R at Sides of Screen + Center Below (Traditional Compromise)
In the traditional setup where the left and right speakers sit at the usual 22–30° angles from the main listening position and the center channel is placed below the LED wall, performance and aesthetics find a middle ground. This arrangement is familiar in many living rooms and media spaces and often results in a clean visual layout with simpler cabinetry options. However, the sonic image may anchor slightly lower than ideal without correction, and in rooms with a large screen mounted close to the floor, the center channel may sit too low to deliver optimal clarity. This configuration is best suited for family rooms or hybrid spaces where furniture placement and overall design priorities guide speaker positioning.
How Trinnov Restores “Behind Screen” Audio Localization
Even with thoughtful speaker placement, physics limits how close we can get to true “sound from the screen” without an acoustically transparent surface. Trinnov’s Optimizer and 3D remapping engine use precise microphone-based room and speaker localization, object-based audio spatial remapping, and virtual soundstage repositioning This allows the processor to re-map the apparent source of dialogue to the center of the LED wall, even if the physical center speaker sits above or below it. In other words, the audience perceives audio coming from the actors’ mouths, not the speaker’s physical location.
Trinnov is most beneficial when the center speaker must sit more than 12–18 inches above or below the vertical midpoint of the screen, when the room includes multiple seating rows, or when the left, center, and right channels need to be spaced wider than ideal. It’s also highly effective when two center speakers, one above and one below, need to be blended into a single, cohesive phantom source. While Trinnov can refine and correct challenging layouts, it doesn’t replace the need for thoughtful speaker placement; it enhances the foundation rather than compensating for poor design.
Subwoofer & Surround Speaker Considerations with LED Walls
When designing audio around an LED wall, subwoofer and surround placement generally follows standard best practices since the wall itself does not vibrate like a projection screen. Subwoofers remain flexible in positioning, though using two or more is still recommended to achieve smoother bass response across the room. Side surround speakers should follow Dolby or Atmos guidelines unless architectural constraints require adjustments, and height speakers can be positioned normally, as the LED wall has no impact on ceiling-mounted Atmos channels.
Calibration, Color Management & Long-Term Stability
Unlike TVs, LED walls do not arrive “perfectly calibrated.” Even premium panels need on-site adjustments because they are assembled from multiple cabinets that must behave as one seamless display. Proper calibration is critical for color accuracy, uniformity, and long-term stability.
Why Calibration Matters
Every LED module varies slightly in brightness, color output, and black level—even when they come from the same manufacturing batch. Without proper calibration, these differences can become visible as subtle color shifts between cabinets, uneven brightness that creates “mura” or patchy areas, and noticeable borders between modules during camera pans or solid-color content. Calibration is what transforms the entire display into a unified visual surface, ensuring the wall appears as one seamless image rather than a collection of tiles.
Ongoing Stability & Re-Calibration
LED walls age gradually, and although the changes are subtle, they are measurable, especially since blue diodes tend to dim faster over time. To keep the image consistent, ongoing recalibration is important. A typical schedule includes the initial installation calibration followed by a check within the first year, then continued recalibration every 12 to 24 months afterward.
As a pro insight, walls built with COB technology usually experience more uniform drift across their modules compared to SMD, which makes recalibration easier to perform and helps the corrections hold longer.
Maintenance, Serviceability & Expected Lifespan
LED walls are modular systems with replaceable components. Indoor dvLED systems typically have a lifespan of 80,000–100,000 hours to half-brightness. That’s 27 years at 10 hours a day. Over time, brightness gradually reduces, and calibration keeps color accurate. Unlike OLEDs, dvLED walls have no burn-in risk, making them ideal for high-use spaces.
With proper planning, maintenance is easy and minimally invasive, but only if designed correctly from the start. LED walls generally need:
- Periodic calibration (as covered above)
- Occasional module replacement if individual pixels fail
- PSU (Power Supply Unit) replacements over multi-year lifespan
- Dust management / airflow checks
Cost Framework & Total Cost of Ownership (TCO)
LED walls are premium displays. Costs vary widely based on size, pitch, technology, processing, power, and installation complexity. This section explains the cost drivers without listing numbers, so homeowners understand why pricing differs from TVs or projectors. dvLED is efficient, as there are no bulbs or lasers to replace, so most operating cost considerations are electricity usage with the occasional service visit and recalibration every 1–2 years. Over a 10-year period, LED walls often match or beat the TCO of high-end projector systems, which require lamp/laser replacements, screen replacements, and frequent recalibration.
Room Scenario Examples
LED walls are not only for dedicated theaters. They can transform a wide range of residential environments. Below are realistic scenarios showing how LED fits into different room types, including design considerations and recommended audio approaches.
1. Luxury Family / Living Room
A luxury family or living room LED wall should deliver a strong “wow factor” while supporting daytime viewing, sports, casual movies, and everyday family use. LED excels in these spaces because it maintains high brightness even with windows and lights on, eliminates glare and washout issues common with TVs and projectors, and offers a durable surface, ideal for kids and pets.
A pixel pitch between 1.2 and 1.5mm works well here, paired with COB or GOB technology for added durability. For audio, placing the left and right speakers at the sides of the screen with a center channel below, combined with Trinnov processing to lift the center image, provides strong performance across flexible seating arrangements such as sofas and sectionals. Design-wise, the LED wall should be blended into millwork or a feature wall so it becomes part of the room’s architecture rather than appearing as a traditional “screen.”
2. Dedicated LED Home Theater
In a dedicated LED theater, the goal is to replace a traditional projector and acoustically transparent screen with an LED wall to create a modern, premium cinema experience. LED performs beautifully in this environment thanks to its high contrast, HDR performance, and the ability to enjoy sports or games without requiring a dark room. It also eliminates projector fan noise and avoids issues with lamp or laser lifecycles.
A pixel pitch between 0.9 and 1.2mm is ideal, with COB being the preferred LED type for its visual quality and durability. The best audio layout uses top and bottom center speakers with Trinnov virtual realignment, supported by left and right channels flanking the screen at 22–30 degrees. Brightness should be kept around 250–350 nits for cinema mode. To maintain perceived black levels, surrounding wall finishes should be matte and dark.
3. Hybrid Theater & Media Lounge
A hybrid theater and media lounge must perform well as both a family gathering space and a cinematic environment. LED is an excellent fit because it adapts effortlessly to multiple types of content, such as gaming, sports, streaming, and movies all look exceptional. The display should include two calibrated presets: a Cinema Mode at roughly 200–300 nits with a warmer tone, and a Media Mode at 400–600 nits for general use.
A pixel pitch in the 1.2–1.5mm range strikes a good balance for mixed content and viewing distances. For audio, placing all front speakers above the display and using Trinnov processing helps anchor the sonic image to the screen. From a design perspective, integrating the LED wall with adjustable ambient lighting scenes allows the room to shift easily between social and cinematic modes.
4. High-End Gaming Room & eSports Den
A gaming or eSports-focused LED room prioritizes ultra-responsive performance and immersive audio. LED walls shine in these spaces because they deliver near-zero motion blur, extremely low input lag, high refresh rates, and excellent brightness with wide color capability. Pixel pitch can range from 0.9 to 1.5mm depending on viewing distance, and the processor chain should support high frame rates for competitive play.
Running fiber cabling is a smart addition for future-proofing high-bandwidth gaming needs. Wide left and right speaker placement enhances positional audio cues crucial for gaming. From a design standpoint, RGB lighting behind or around the LED wall can elevate the sense of immersion and tie the space together visually.
5. Fitness, Wellness, or Golf Simulator Room
Fitness, wellness, and golf simulator rooms benefit from LED walls because the displays remain bright in open or naturally lit spaces and offer rugged surfaces without the tensioning issues of traditional screen fabric. Pixel pitch typically falls in the 1.5–2.0mm range depending on viewing distance, with GOB or COB modules recommended for their durability.
Audio requirements are generally simpler in fitness and wellness environments, as they rarely demand full cinema-grade setups. In golf simulator applications, LED walls can integrate smoothly with ball-tracking technology, though brightness may need to be carefully tuned so it does not interfere with sensor performance.
6. Luxury Entertainment Zone or Party Space
A luxury entertainment or party zone benefits greatly from an LED wall that serves as a dynamic visual centerpiece for multi-zone AV, karaoke, DJ performances, sports viewing, and ambiance-driven content. LED is ideal here because it provides bright, vibrant visuals that cut through mixed or high room lighting, much like a professional club environment.
A pixel pitch between 1.5 and 2.5mm is typically sufficient, and COB or GOB LED types provide durability and strong visual impact. Audio systems in these rooms should emphasize dynamic range and may require additional zone speakers or even light PA support depending on the room’s purpose. To enhance usability, it’s helpful to program preset modes such as Sports, Lounge Art, Karaoke, DJ Visuals, and Movie Mode so the space can transform quickly for different events.
Let’s Talk About Your Video Wall Project
A custom video wall can transform the way you watch movies, host gatherings, or enjoy gaming at home, and Interactive Spaces is here to help you create one that fits your lifestyle. Whether you’re envisioning a dramatic media room feature, a multi-screen sports setup, or an immersive entertainment wall, our team will guide you through the best display options, layouts, and system design.
Connect with Interactive Spaces today to start the conversation and explore what a custom video wall can do for your space.